Worms Update

Checked the worms again today. I was hoping to switch out a bucket of castings for the latest bin of waste material. Happily, the worms are still thriving, even when we were away for a few days, and I couldn’t be there to lift the lid for them (for a bit of fresh air).

I have been unable to find the original post that prompted me to try this experiment. Here is a semi-similar one though: http://vermicomposters.ning.com/profiles/blogs/5-gallon-bucket-experiment-1. I found his results interesting.

My worms are multiplying. They remain near the top of the bucket and do their business there. They are not drowning in worm juice as I feared they might.

I hypothesize that the leaf litter and tiny sticks mixed in on the bottom of the buckets are creating a sponge for the juices. Whether it’s the air pockets created by the crossed sticks and eggshells in the bucket allowing them fresh air or my lifting the lid, I don’t know. Maybe it’s both.

Bucket #1 is just now getting to the barely-recognizable stage of decomposition. Bucket #2 still has mostly moldly, slimy-looking food residue. Neither, however, are ready for emptying. I definitely need to re-vamp with more worms if I want to make this a feasible option through the winter. Based on bpearcy10‘s findings, though, I would need to be sure to find the right ratio of food to worms and split them off, once they have multiplied. Maybe it’s time to invest in a scale . . .

Mentor Check-in

My husband and I grabbed the opportunity tonight, the niche in time, to catch up with my permaculture mentor, Doug Crouch. He’s been in Portugal for the past five months, so we really enjoyed hearing the progress on his work there. He asked about what I’ve been reading, progress on the land purchase process, my opinion on my online course with Geoff Lawton, and how the design process is coming on the land (Forkland Rd.).

I was really honest with him that I am getting mired down in the details of the elements and throw my hands up in frustration many times. Doug has re-encouraged me to take some steps back, print out an overview map, write down simple elements on small slips of paper with no details at this point, and start playing around with placement. He wants me to get back to the fun of the process.

We talked about a vision for field schools as an alternative or complement to university training, considering how ill-prepared for real life we have become with the lack of practical skills-training we receive. This really hits home right now, as we face all the work we need to do on the house to make it live-able to American standards. Especially since our return from Haiti, I find it very ironic that it is practically illegal to live without running water and electricity here.

Just a few days ago I read an article in the local paper where the lack of these two conveniences were held forth as two of the standards that determined a couple was unfit to keep and raise their own children. I found that nauseating. Yet here we are, and now we must scramble to learn these skills from scratch to make our own home acceptable to our culture.

More thoughts to come . . .


Plans for Winter Hot Water

So here’s what I’m thinking for our hot water this winter:

http://www.youtube.com/watch?v=_pnuyEkM0xg

I love the calm, simple way “Hadley” explains his system. For the first couple weeks in our “new” house we will probably be heating water on top of the woodstove, but I hope to graduate to this system once we feel comfortable that we can execute it properly. During the summer I would like to go solar. We would have electric back-up for both of these.

Eventually, we may be able to work in a rocket mass heater as the primary winter hot water source, to save on wood and the environment, but we need to gather more knowledge/experience before we go there. I don’t think our floors can handle three tons of weight without shoring up.

How to Use USGS to Create a Base Map

There was a time when I had no clue where to get started with making a base map. I taped together six to eight sheets of paper, trying to get something big enough to work with. I quickly got irritated, because I like precision, and I could not seem to get my sketch adequately accurate.

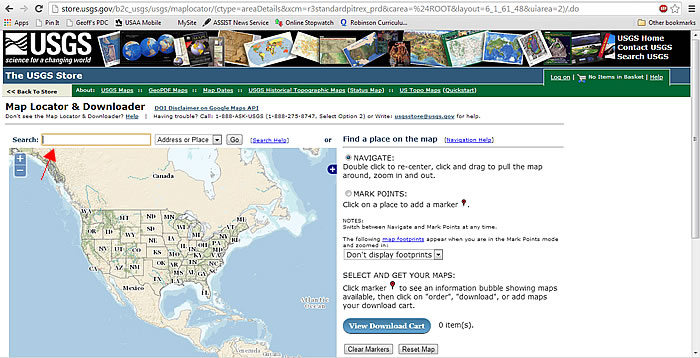
After much trial-and-error and many google-searches later I finally stumbled upon the United States Geological Survey website. At http://www.store.usgs.gov you will see this page:

usgs

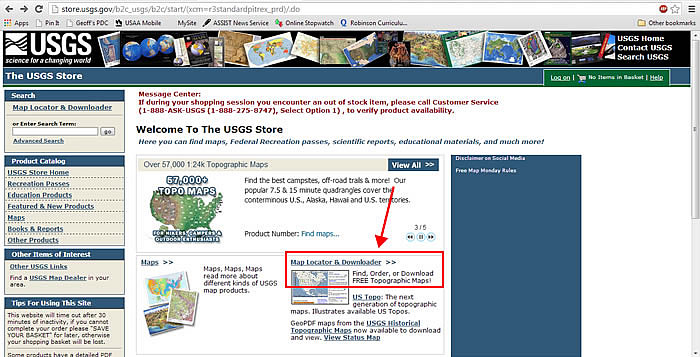
Once you click on the Map Locator & Downloader, enter your address or keep double-clicking (PC) on the general location you want to see until it zooms in as far as the map will go.

usgs2

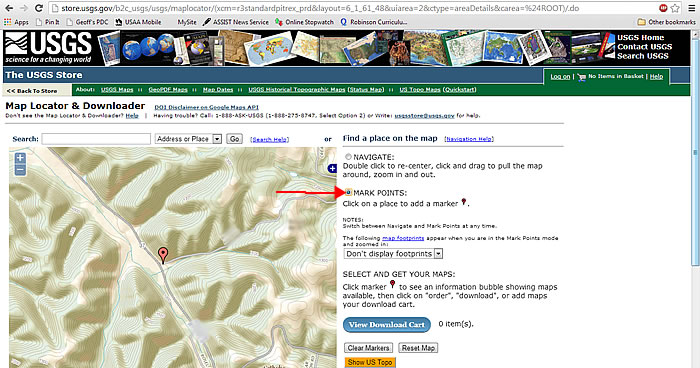
Once there, you will want to select MARK POINTS, and add a marker to the specific location you want.

usgs3

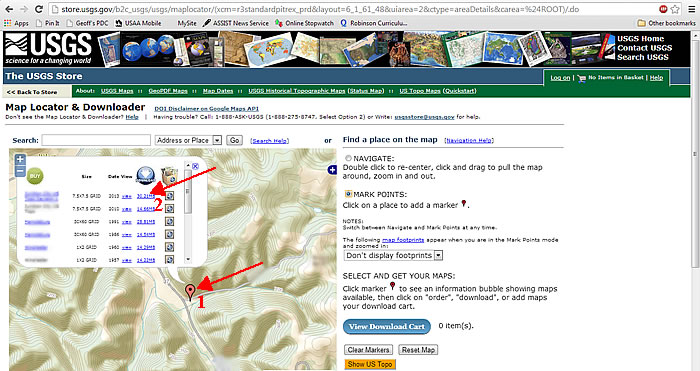
Next, click on the marker (1), and a list of map choices will pop up. For the longest time, their wording escaped me, and I thought I would be “buying” one of these downloads or buying a physical map. I did not go past this point and only used the map I could see for visual reference. No, it’s much simpler, and it’s free. You just click on the download size for the map you think might work for you (2) (you can check the preview first if you want), and it will download to your computer.

usgs4

Once you locate the download on your computer, open the PDF. Find the location for which you want to create a base map and zoom in until it is mostly those property boundaries filling the screen. This large map does not lose quality, so you can zoom in very far.

Press and hold Alt and PrtSc [Print Screen]. This will create an image of the portion of the map that is on your screen. You will then want to paste this image into the program of your choice. I use Fireworks, because that is what I have, but Photoshop or possibly some drawing programs or PowerPoint would work. When you open a new document in Fireworks or Photoshop it should be automatically sized to the dimensions of your saved image. Once the new document is open, just Ctrl + P [paste], and your map section should appear.

From there, crop off all the messy edges. I will save the rest of the details for another post, because from here it gets a little ugly, at least for me, working out the legends to be sure that any overlays you have or elements you add are to scale.